Hello my good citizens of the Devforums! Today, I’ve decided to teach you how I use Adobe Illustrator, if you are currently finding it difficult to use. Lets begin:
Setup
First, open up Illustrator. I’m using the latest version of Illustrator CC.
These are the artboard settings I use, but in all honesty, I work away from the artboard 

You’ll start with a blank canvas. This is the layout I use. I highly recommend using ‘Essentials’ mode, which you can find on the top right of the screen. Feel free to copy my layout, I didn’t change that much.


Tools
Lets go over your most important tools. These are the ones I find useful and use the most.
- Selection Tool
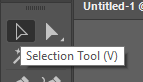

Allows you to select one or multiple vectors, images, etc. and move them around, as well as resize and rotate, to name a few.
- Direct Selection Tool


Allows you to select vector points instead of the whole vector, so you may perform accurate repositioning.
- Pen Tool


The most important tool, used to make vectors.
- Type Tool


For making logos and typography. (If you’re making commercial logos with fonts, make sure to buy typekit too!!)
- Line Segment Tool
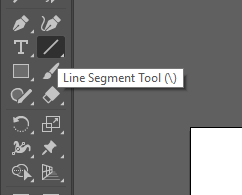

Used to create lines easily.
- Shape Tool
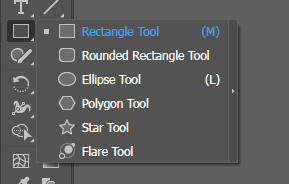

Important in making sure your vectors are proportionate. It’s best to work from shapes than freehand sometimes. I use all of them bar the Flare regularly.
- Eyedropper Tool


Allows you to select a colour to use, from a vector, image, etc.
These are the main tools I use regularly, and you will be able to accomplish pretty much everything with these tools alone.
Colour

White is your vector colour, you can double click it to select your own colour while having the vector selected, or for accurate colour picking, press shift while clicking the Eyedropper Tool and hold down shift while you select your colour.

Black is the stroke, which is the outline of your shape. Can be changed the same way as white.
Arrow in the top right allows you to invert your colour palette, so the vector will turn black and will have a white stroke.
The black and white shape in the bottom left reverts your colours back to the default black and white, the colours I am using right now.
The white square below means that your vector will have a solid colour. The gradient beside it gives it a gradient, and the white box with red line makes the shape transparent. The same can be applied for the stroke too, whether you want a gradient stroke, solid stroke, or have no stroke at all. 90% of the time, I dont use strokes on vectors such as UI icons.
Making a shape
In this instance, I will be using the artboard. Most of the time I work off it. Anyway, click with your Pen Tool to make an anchor point, and click somewhere else to create a line. The Line Segment Tool can also be used instead, but in this case, lets stick with the pen tool.

Press CTRL + Z to go back to your previous anchor point, and instead of just clicking again, click and drag to make a line curve.

You can also hold shift while dragging to make lines more accurate when matching up to other shapes, if you wish to join with a flat edge.

When you move your cursor again, you will notice the line is still curved. If you wish to cancel this, simply click on the anchor point you just made.


Join up the points together and congratulations, you have just made your own shape! Click on the Selection Tool to view the shape as you would normally.


You may notice that sharp angle on the top left. To solve this,click the Direct Selection Tool, select that point, and drag the small blue circle that appears.

If it applies, you can just select the whole shape with the Selection Tool, and more than one blue circle may appear if you have other sharp angles, so they can all have the same smoothness.
This is how to create shapes on Illustrator, you will then combine these shapes to create your own masterpieces!
Oftentimes, I will use rectangles, circles and more to put into my icons, but the shapes will not maintain their aspect ratio. **To solve this, hold down shift while clicking and holding the cursor when you have a Shape Tool selected, like a Circle for instance. You will get a circle instead of an oval.
Layers
Just skimming through layers, as they’re important for one tool in the next section.
The layers tab allows you to see how many items you have per layer. You can change their order, delete, make new layers, group, etc.
It is on the right hand side of my screen for me. If it is not there, you can select it from the Window Menu, or by pressing F7


Layers are important as you can easily manage what to display at any one time. You will need to change the order for shapes when we come to the Minus Front Tool in the next section.
Pathfinders
Ah yes, the CSG of Illustrator. Use this to create shapes that would otherwise be difficult to reproduce freehanded. In this guide, I will be intersecting a circle and a rectangle together.

Pathfinder looks like this, in one of the UI columns, in my case, on the right hand side. If it is not there, you can select it from the Window Menu, or by pressing Shift + CTRL + F9.


Click and drag your cursor, or press and hold shift and click on objects to select them. Keep in mind, these tools do NOT work on images like PNGs, JPEGs, etc. They have to be svgs.
Tools:
- (yo)Unite Tool


To merge two or more shapes together.


- Minus Front Tool


Whatever shape is in front (LAYERS) will be deducted from the shape behind it. In my case, the rectangle is in front of the circle.

- Intersect Tool


Makes a shape from where the two shapes intersect. Picture a Venn Diagram.

- Exclude Tool


Removes the contents of the intersection

These tools help a LOT to make sure that you can achieve a complex shape with minimal effort.
Saving.
So, you’ve got your shape finished. I’ve created this monstrosity.

So, I want to export it for use elsewhere. Click on File → Export Selection.

You will be greeted with this screen. Here, you can change the name, file extension, size, location, and more.

I’ve decided to save this shape as a .png with a 2x Scale (so the shape is now 2 times larger), and removed the ‘@2x’ suffix by deleting said text. I would export it as an svg, but sadly, Roblox hasn’t evolved to the point where we can use svg’s ingame.
Anyway, I hit Export Asset, and it goes to my Desktop, as I’ve directed it to do so.
That’s it!!
Neat things to know.
- CTRL + Spacebar + Dragging cursor allows you to zoom in
- CTRL + ALT + Spacebar + Dragging cursor allows you to zoom out.
(I highly recommend you learning these shortcuts, they help out immensely.)
- Looking at the Fibonacci Square is good practice too, for appropriate and proportionate sizes.
- Tutorials on Youtube don’t hurt! I often come to them when I’m stuck.
Closing
I hope you found this tutorial informative, and hopefully will help out people with their struggles with Illustrator!
Finally, I’m here to answer any questions you have regarding it. You can ask me here, in Devforum DMs, or on my Twitter !
Thank you for reading!

