Intro
A new update has been created here! Baked Lighting "Engine" - Update 1
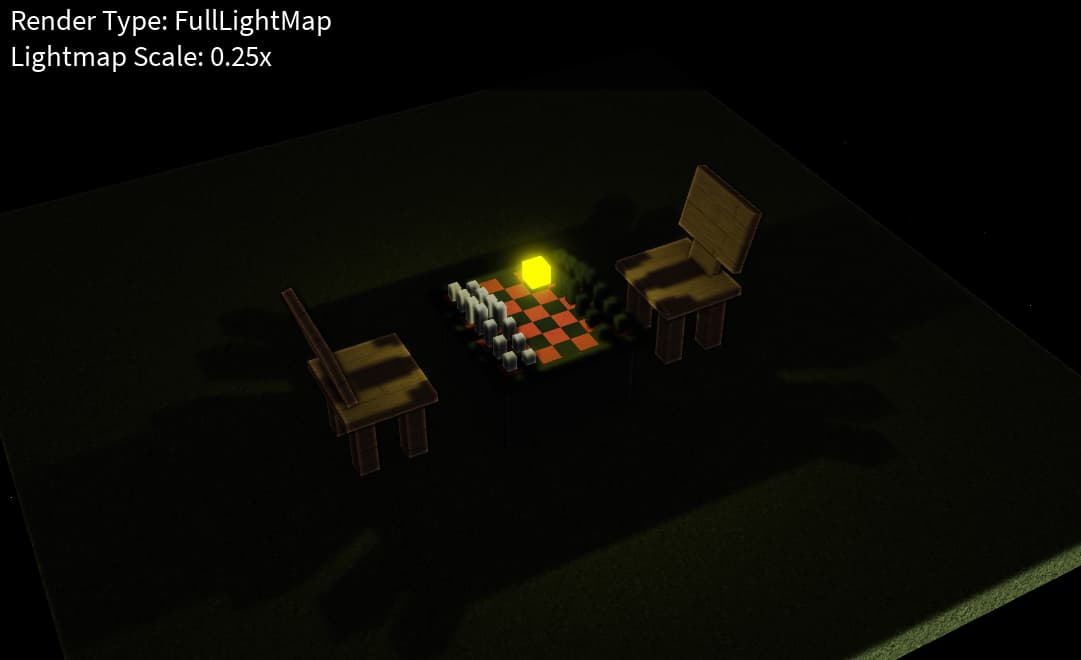
This is an entire lighting-rendering simulation that’s designed to replace Roblox’s or add onto it. The way lighting is rendered using this system is pretty simple, and similar to how engines like Source render their lighting, where every surface is divided into a grid. The color of each grid box in that grid is then calculated based on raycasting to light sources, and directional lighting.
The images showcased are completely rendered only using this lighting system. Meaning that on Roblox’s Lighting service, technology is set to voxel, global shadows are set to false, and all ambient values are set to a solid color. All lights included within a scene are also disabled, and rendered only using the baked lighting engine.
Lighting is only rendered once throughout the given scene and is not dynamic. This could be useful for people on lower-end hardware which have a considerable performance impact by Roblox’s real-time lighting and shadow options, such as future lighting. Baked Lighting still allows realistic shadows and diffuse lighting regardless of the user’s hardware.
Real-time lighting though is also possible using only this system. This is seen in the last gif posted at the end of this article.
Things You Should Know (Updated 4/10/22)
If some of these things don’t make sense, make sure to read the rest of the post.
- This framework is designed for boxes, meaning all parts (regardless of whether they’re wedges, balls, cylinders, etc.) will be treated as six-sided boxes.
- This system is designed for Point lights, meaning any other type of light will be treated as a point light when rendered.
- If rendering becomes slow, consider:
1.) Making the size of the part you’re rendering smaller. Rendering an entire baseplate for example isn’t a good idea, since its size is massive. On top of this, tons of intricate tiny parts can increase lag, as several more faces have to be accounted for.
2.) Making “bounding boxes” with simplified parts to render lighting for instead of rendering every detailed part in your scene could help with lag.
3.) Changing the render scale to something larger.
4.) This one is kind of a last resort. You could change the iteration and yield times in the lightmap module on lines 46 ad 47. What these values do is explained in the script.
How Do I Use It?
The core module: Lightmap.lua (21.3 KB)
A demo place file: DemoLightmapsParallel (3).rbxl (38.6 KB)
After requiring the Lightmap module in any script, there are a few functions you can use to start rendering baked lighting.
You can render baked lighting for specific surfaces of an object using:
lightmap.renderSpecificSurfaces(mainScript, faces, object, lights, renderScale, renderType, globalShadowsEnabled) ```
-
mainScript is the current script that’s running. This should just be passed in as
script. - faces is a table with the faces you want to render baked lighting for. You can choose from “Top”, “Bottom”, “Right”, “Left”, “Front”, and “Back”
-
object could either be a BasePart or an Instance with parts in it
which the lighting will be baked for. - lights is a table with the local light sources that will be taken into account when baking lighting.
- renderScale is a number that states the size of each grid box in studs.
- renderType is a string that states what elements of the scene will be rendered. You can chose from “FullLightMap”, “Shadows+AllLights”, and “OnlyShadow”. I’ll explain these options in further detail later.
- globalShadowsEnabled is a boolean that states whether directional lighting will be taken into account when baking lighting.
You can also render baked lighting for all surfaces of an object:
lightmap.renderAllSurfaces(mainScript, object, lights, renderScale, renderType, globalShadowsEnabled)
Removing all baked lighting can be done with:
lightmap.removeAllLightmaps()
Some of these properties might be a bit difficult to understand without visuals, so I’ll show some examples in the next sections.
Render Scale
As described earlier, render scale states the size of each grid box in studs. By default, it’s set to 2 on line 16 of the Lightmap module.The higher the value, the lower the quality of the baked lighting will be and vice versa. Keep in mind that higher render scales will take a lot less processing power to render compared to lower render scales.
(All objects with baked lighting are highlighted in red)


Render Types
As also described earlier, Render Types state what elements of the scene will be rendered.
-
“FullLightMap” renders every single grid box, as well as those not exposed to any light sources. This is the slowest render type, but also provides the best results.
-
“Shadows+AllLights” renders every single grid box exposed to a local light source and in shadow. This means that when global shadows are turned off, the lighting will only render as far as the light sources that are given. This is the second slowest but also results in almost identical lighting to “FullLightMap”.
-
“OnlyShadow” renders only shadows. This is the simplest and fastest rendering method.


Final Notes
Hopefully, that’s all you need to get started. Here are some demos created using the framework! Have fun baking!
(Chessboard)
(Crossroads)

(Realtime Shadows)


