How to Automate Place Publishing with Partially Managed Rojo

Automation is GOOD!


About

Many developers are seeking to use external tools like Rojo or Argon, but many don’t know that you can improve your productivity and team management by simply using a tool like git and GitHub. You can allow each of your developers to have his own coding space and then merge them together into your testing space; once tested, you are free to publish your game to “production”, fully automatically (well, almost).


How is it done?

Tools like Rojo allow you to sync Roblox Studio with other code editors or IDEs like Visual Studio Code. That not only allows you to use third-party extensions, but also version control with git, easier styling, colorizing, and adding themes to your editor, more powerful AI, auto-complete tools like GitHub Copilot, powerful linters, lua language servers and much more. Let’s look at a graph of how our system will work:


credits to this person’s post for this image

With Fully Managed Rojo it’s very easy to implement this since Rojo already has a compiler to automatically build your place file, which you can then use. In our case, though, we are only using Partially Managed Rojo. This means that Rojo will only be used for scripting purposes and not edit the game completely. It is not recommended to use Fully Managed Rojo because it’s just too incompatible and can always run into an error while building it. Rojo is also not maintained well anymore, which makes it really outdated. This is why this Tutorial is also compatible with the best (in my opinion) Rojo Alternative called Argon. It offers a vast variety of functions and better support for most stuff, and it’s just easier to set up. What you pick is your choice, since we are going to manually build the place file each time.


Okay, let’s do it!

The fact that you are looking at this post means that you at least have a basic understanding of what you are reading or doing. If you are not familiar with what is going on, you should take a deeper look into what Rojo is before getting into this topic. Git and version control are hard to learn, and I am not a master in either.

Here is a very useful video with something similar, but for Fully Managed Rojo.
Watch it if you need a video example of what we are doing. Keep in mind that this video uses foreman, which is outdated; aftman is very similar.

I made a repository that you can find here, feel free to use it as an example. It has all default stuff you need. Once you download it you should be already set up to use it, simply change the IDs of your places and you are good to go.

First of all, head to your Rojo or Argon project. If you don’t have Aftman installed, then follow the instructions in the dropdown.

What is Aftman and how do I install it?

Aftman is basically a package manager. It is a straight replacement of the old popular package manager for most external Roblox and Lua libraries, called Foreman. Foreman is being replaced by aftman; both are good, but aftman is just better.
It is highly recommended to install Rust Lang since most of the libraries are available there and you might just learn something more, but if you don’t wish to install Rust, then follow the official documentation of Aftman on how to install it without Rust. Here.
First of all, install the Rust programming language. That will also install cargo, which is a package manager like npm. After you get rust installed, simply open up a terminal and enter cargo install aftman. After it’s done installing, make sure to run aftman self-install and finally confirm you have aftman installed with aftman --version. Now you have it installed!

Open up a terminal in the directory of your Rojo project file and type aftman init.
That will create a new aftman.toml file, which will contain an example of how we are going to use it. In this tutorial, we are going to be using quite a lot of dependencies. You can just copy the snippet below to your file.

[tools]
stylua = "JohnnyMorganz/StyLua@0.18.0"
selene = "Kampfkarren/selene@0.25.0"
rojo = "rojo-rbx/rojo@7.3.0"
rbxcloud = "Sleitnick/rbxcloud@0.5.0"

StyLua a code formatter that makes your code look better and more readable. Very useful when collaborating in a team. Makes your code stand out.
Selene a Lua code linter. Basically, it finds issues and problems in your code that you need to resolve. For example, unused variables or type errors This will be your main saver for when someone makes a mistake on your team but doesn’t correct it.
Rojo of course.
Rbxcloud open-source CLI library for accessing the Roblox Open Cloud. We are going to use it to publish our games automatically.

Remember to aftman install and then make sure to aftman list to confirm everything installed. You can also optionally try each of the tools command interfaces.
rojo --version, stylua --version, selene --version, rbxcloud --version, etc.

Now make a new file in the directory of your project called selene.toml. This would be an essential configuration file for Selene. Inside, put the following:

std = "roblox"

That should be it.
Now make a folder in the directory of the project called .github. Also, make sure you have a PRIVATE repository on Github; initialize it if you don’t. Now head over to the folder and create another folder inside .github called workflows. Now create 3 files each named like this:
ci.yaml - Checks with StyLua and Selene for code problems.
deploy_prod.yaml - Auto publish your game into the main place once your update is ready.
deploy_staging.yaml - Auto publish your game into the testing place only accessible by developers or your testers.

ci.yaml

name: CI

on:
  push:
    branches:
    - dev

jobs:

  lint:
    name: Lint
    runs-on: ubuntu-latest
    steps:
    - name: Checkout Code
      uses: actions/checkout@v3

    - uses: ok-nick/setup-aftman@v0.3.0
      name: Install aftman
      with:
          token: ${{ SECRETS.GITHUB_TOKEN }}

    - name: Lint
      run: |
        selene ./src

  style:
    name: Styling
    runs-on: ubuntu-latest
    steps:
    - uses: actions/checkout@v3
    - name: StyLua
      uses: JohnnyMorganz/stylua-action@v3
      with:
        token: ${{ secrets.GITHUB_TOKEN }}
        version: latest
        args: --check ./src

deploy_prod.yaml

name: Deploy to Production

on:
  push:
    tags:
    - 'v*'

jobs:

  deploy:
    name: Deploy
    runs-on: ubuntu-latest
    steps:
    - name: Checkout code
      uses: actions/checkout@v3

    - uses: ok-nick/setup-aftman@v0.3.0
      name: Install aftman
      with:
          token: ${{ SECRETS.GITHUB_TOKEN }}

    - run: rbxcloud experience publish -f game.rbxl -p ? -u ? -t published -a ${{ secrets.API_KEY }}

deploy_staging.yaml

name: Deploy to Staging

on:
  push:
    branches:
    - main

jobs:

  deploy:
    name: Deploy
    runs-on: ubuntu-latest
    steps:
    - name: Checkout code
      uses: actions/checkout@v3

    - uses: ok-nick/setup-aftman@v0.3.0
      name: Install aftman
      with:
          token: ${{ SECRETS.GITHUB_TOKEN }}

    - run: rbxcloud experience publish -f game.rbxl -p ? -u ? -t published -a ${{ secrets.API_KEY }}

Now that you have all that done, you will notice a few things. There are ? question marks in some parts. Now, let’s head to our main game, where people play. Open it in Studio, open the command bar, and type print(game.PlaceId, game.GameId). Now under the deploy_prod.yaml file, on the very bottom, where the question marks are, replace the first mark with game.PlaceId, and the second one with game.GameId. Repeat the same step for deploy_staging.yaml, open your testing place in Studio, run the command in the bar, and replace the question marks in the file. Now that’s set up, head over to your GitHub repository settings, go to secrets and variables, then actions. There is a new secret. Name it API_KEY. For the value, head over to the credential tab of your game. Make a new key, name it whatever, and describe it whatever. Add Place Publishing to the API system. Select both of your games, the main and testing.

(for better security, you might want to use an alternate account and also make a key for each place in case one gets compromised. (To add a second key, just name it API_KEY2 on GitHub, and depending on which game it is, change ${{ secrets.API_KEY }} to ${{ secrets.API_KEY2 }} in the file depending on what game it is.)

Add write permissions; under IPs, enter 0.0.0.0/0 if you don’t know what you are doing. If you do, then add the IPs you need.

Create the key, copy it, paste it to GitHub, and you are ready to go.

Remember to remove your place file from .gitignore if it was there.

Commit and push all your changes; if you did everything correctly, it should work. Now on your repository tab, under actions, a new workflow should appear. Look for any errors. If you do get any, try to resolve them with the power of the internet. If you can’t, leave a reply here and I or someone else will be here to help you.

Now onto more details. Your GitHub repository must have two branches set up. main and dev Now let me explain how it works.
All developers will only commit changes to the dev branch. After your test build is done, someone will open Roblox Studio, sync their place with Rojo, then go to the top right corner, file, and click on download a copy. Then save that copy to the directory of the project file and make sure to name it game.rbxl. This will be your test version. Now, commit changes to the dev branch and make a pull request to merge dev with main. If there are no issues with the code, a higher-up with permissions can merge them. After it merges them, it should now upload that test file to your testing place for developers and testers automatically. From there, simply test your game and make more updates until you are ready to release your update to the community. Once you are done, make sure you select the main branch, press on Create a new release or tag, and then make your tag start with v. It MUST start with v unless you configure it otherwise. You can put anything after v. For example, v0.1.5-alphaFor example, "v0.1.5-alpha," "v0.3.4", "v2.8.9-release, etc. Add a name, description, etc., and create the release. GitHub should now automatically get that same file that you downloaded from Studio, and then it will upload it automatically to your main game for people to play. This allows for a lot of permission management in your development team, and it’s just an overall must-have for teams with more than 2–3 people. It makes life easier, and most importantly, on a professional level.

Here is how your final root directory should look:


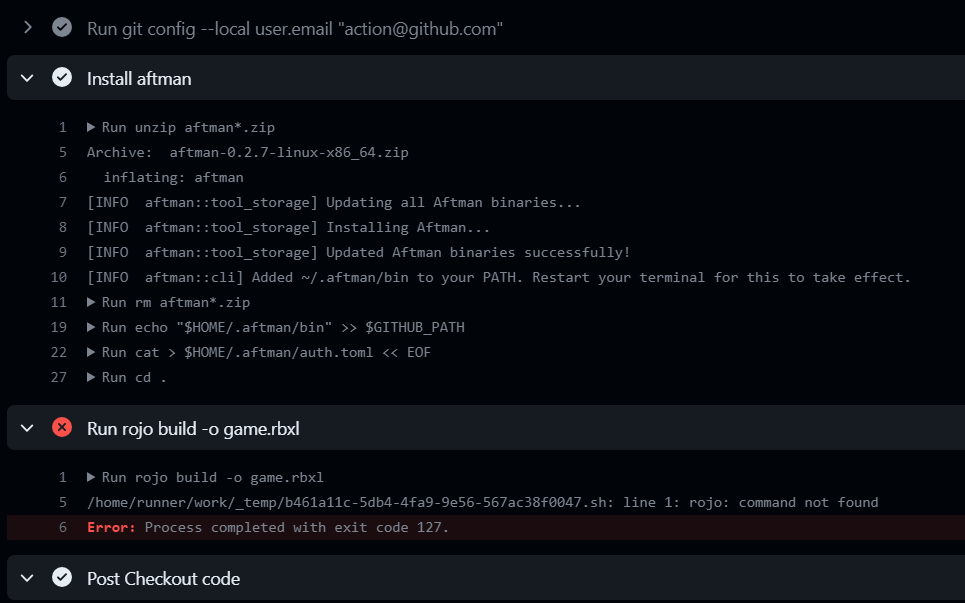
Here are GitHub actions doing their stuff:

Here is how I like my vscode personally:

Everything is nice and clean.
Thank you for taking a look at this tutorial. For any feedback, please leave a reply or hit me up in DMs. Now go and master the full power of Roblox Studio and extensions.
Here is what I use from my vscode extensions:

  • rojo
  • selene
  • stylua
  • codesnap
  • discord presence
  • gitlens
  • material icon theme
  • roblox lsp
  • toggle quotes
  • vibrancy (transparent background)

I hope this suits you well, good luck!

This is my first post in this category. I’m sorry for any mistakes or misunderstandings. Please correct me if I’m wrong.

33 Likes

I am glad that you made a tutorial about automating game development.

Just wondering, why is action/checkout needed to be used in the steps of every workflow files and what does it do?

4 Likes

Hi, thanks for pointing out this question.

action/checkout as far as I know, allows GitHub Actions to access its own repository files. Without it, the workflow will not have access to any essential files. In our case, we need aftman.toml and selene.toml for configuration and game.rbxl for our build. That just fetches the latest version of the repository. It’s required in any case, if that is your question. Without it, your action will be literally useless because you can’t access any of the files, and the point of those is to first check the code with Selen and Stylus and confirm everything is correct and that no one made an error in the code. The second point is to get the build file. Sadly, with partially managed rojo or other extensions, you can’t build the whole game, but only the project file, which doesn’t contain anything other than your scripts, so we have to “build” it every time we are going to push to the test version (you can still test in studio without downloading the copy, but if you need to test specifically in the actual game, then you have to do it). It’s just an extra step for publishing your place, but it’s worth it. You sacrifice some 10 seconds extra, which is not a big deal, but when you are working with a team of people, you want scalability and control.
Check out this resource; it explains that a little more.

2 Likes

Do you happen to have a template GitHub repository?

I’ve been trying for the past 4-5 hours to get it right, can’t seem to do it :sweat_smile:

2 Likes

As per your request, I have made a full repository that you can download to speed things up. You can now just download it, and everything should be pre-set up for vscode. If you have any issues, don’t hesitate to ask. It has main and dev branches, a release tag, some commits that failed, and some examples for you to see. Just go through it and check what happened.
You can find it on GitHub here:

2 Likes

Nice tutorial for setting up CI/CD that otherwise would probably take a couple hours!

Do you by any chance know if there’s a way to version control assets properly? As in the map, builds, any instances you add to the place.

2 Likes

Wow this is quite a lot. I would have never of come up with such an amazing and complex workflow. Definitely will use this for all my future projects. Thanks for letting us steal borrow your epic GitHub Workflow setups and sharing.

Feedback: I would add more to the .gitignore to account for VSCode’s temp files and such. Another one that is small is a extensions.json file in the .vscode folder so people can download the needed extensions easily from the sidebar in VSCode.

Overall,

11/10 Great resource and very helpful

1 Like

Thanks for sharing your feedback. the .vscode was left intentionally for people that use the Stylua extension, so it autoformats on every save. As for making an extension list, sure, I will add that soon. I’m glad that people find this Tutorial useful.

As for @kaspar1230’s reply,

Because this is Partially Managed Rojo, this Tutorial was intended for people who will only use Rojo for scripting. All asset management is done through Roblox Studio, and your team members should have access to the dev testing game (but not the main one), but if you really want to track changes in your builders work, you can simply make a folder called assets," for example, and there let your builders upload their asset files of any kind. Models, places, blender stuff, etc. Git version control works so that every time you “commit” (publish) a change to the repository, it wants you to explain in a few words what you did, for example “updated the house model”, You can also use GitHub’s discussions page or just make a group chat with all developers. You can make comments on pull requests and add descriptions; for commits, you can only have a short name for what you just did. In most cases, people leave it as “initial commit,” which basically means you just made a big change, or it’s like a change required for the repository to exist, etc. Like adding new files to a new repository or just making really huge changes. I mean, it’s really up to you how you are going to manage your game; that’s just how I would do it, and this is purely my opinion. If you really don’t want to give other developers edit access to the dev test place, then you will have to upload those assets from GitHub manually.
As per @TinyFlair’s request, I made a repository for you to clone, and he was actually nice enough to share with me his method to automate stuff even further. I’m not sure if this is what you want, but he basically used the remodel library, which is part of Rojo, to merge two places together. Scripts will be below (I can’t confirm they will work specifically for you, but if you need help, feel free to ask).
Note: In the script below, the selene and stylua checks were removed*
GitHub workflow code:

name: CI

on:
  push:
    branches:
    - dev

jobs:

  publish:
    name: Publish to dev
    runs-on: ubuntu-latest
    steps:

    - name: Checkout Code
      uses: actions/checkout@v3

    - uses: Roblox/setup-foreman@v1
      name: Install foreman
      with:
          token: ${{ secrets.GITHUB_TOKEN }}

    - run: remodel run Dev.lua

    - uses: ok-nick/setup-aftman@v0.3.0
      name: Install aftman
      with:
          token: ${{ SECRETS.GITHUB_TOKEN }}
      
    - name: Publish
      run: rbxcloud experience publish -f RoleplayMap.rbxlx -p ? -u ? -t published -a ${{ secrets.API_KEY }}

Remodel’s lua file:

local MapFile = remodel.readPlaceFile("Places/RoleplayMap.rbxlx")
local CodeFile = remodel.readPlaceFile("Places/RoleplayCode.rbxlx")

local Services = {
    ["ReplicatedStorage"] = {},
    ["ServerScriptService"] = {},
    ["ServerStorage"] = {},
    ["SoundService"] = {},
    ["StarterGui"] = {},
    ["ReplicatedFirst"] = {},
    ["StarterPlayer"] = {
        "StarterCharacterScripts",
        "StarterPlayerScripts",
    },
}

for Service, ReplaceList in pairs(Services) do
    local ServiceMap = MapFile:GetService(Service)
    local ServiceCode = CodeFile:GetService(Service)

    for _, Child in pairs(ServiceCode:GetChildren()) do
        local Replaced = false

        for _, Replacement in pairs(ReplaceList) do
            if Child.Name == Replacement then
                for _, ReplacementChild in pairs(Child:GetChildren()) do
                    ReplacementChild.Parent = ServiceMap[Child.Name]
                end

                Replaced = true
                break
            end
        end

        if not Replaced then
            Child.Parent = ServiceMap
        end
    end
end

remodel.writePlaceFile("Places/RoleplayMap.rbxlx", MapFile)

I use something close to VS code but It holds full python

1 Like

The tutorial itself is pretty good and I finally got some peace reading a nice tutorial. However, I did come across an error (in the CI.yaml file).

[The code was copy-pasted from the tutorial]

The problem


Committed a 2nd time and got the same result.

It seems that it were just unused variables causing that issue. No need to check into the problem anymore

1 Like

I want to make this clear for everyone else having this question: those errors are not errors in the code itself but are errors in your own code. Those checks indicate the Lua code you wrote has something wrong. Selene checks for errors, and StyLua checks for styling issues. Those are not errors, but indicators that something is wrong with the code and has to be checked. Feel free to remove them, but when working in an environment like this, you probably want to know that your code has an issue that you can resolve at the moment and not later when it becomes a problem.

1 Like

@iceeburrs Awesome tutorial!

I’d recommend you add in an example of how Wally works in here. Especially the wally.toml and needing to Giignore the “Packages/” Directory.

Otherwise, awesome work!

1 Like

Hey, thanks for letting me know you liked it, but I think you have a missunderstanding because I never used Wally. The package manager is called aftman, which is a replacement for foreman. Wally is pretty much the same as the others, it’s literally up to how you want to use them. I have never used Wally. You might have replied to the wrong post actually, because what you say is completely out of context, but not a big deal. If you really meant to reply here then here is a quick sum-up of what a package manger is:

Wikipeadia

A package manager or package-management system is a collection of software tools that automates the process of installing, upgrading, configuring, and removing computer programs for a computer in a consistent manner.

copied from the wally website

Wally is a package manager for Roblox inspired by Cargo (Rust) and npm (JavaScript). It brings the familiar, community-oriented world of sharing code from other communities into the Roblox ecosystem.
Wally has two pieces that work together: a command line tool named wally and a registry server that hosts packages. Most users will only interact with the command line tool, but both are available in this repository.

I hope this is what you meant by adding an example of how it works. It just brings project specific tools and interfaces for you to use, this is the whole point. If you have worked with javascript before you will be very familiar with node and what it offers you. These tools use the same concept and work in a similar way, node installs the tools locally per project, while most of these install them globally on your computer and keep them in a specific folder so all projects on your host can use it. Basically makes installing specific stuff easier, but makes removing them permanently a little bit harder since you will have to go through a few folders to find them.

Is it possible to automate the syncing with rojo part as well? I have about 4 different places I need to sync my code to and it is a bit tedious to open all of them and sync them. They have slightly different maps and a few different scripts in them so I have to manually go into all of them.

1 Like

If you are talking about syncing Roblox Studio to your Rojo project then no, you can only do that by connecting to the server manually, well except if you are sure you want to overwrite all changes. If you have 4 places and you want to sync them all to one version then you can use roblox open cloud place publishing to accomplish that, but if you meant something else then I doubt it. Yes, you can use open cloud to update a game without publishing it (as far as I know), I think you need to change the status from published to saved. You can read about it on the docs. Hope I helped, if I missunderstood or you have another question then feel free to ask.
rbxcloud documentation

1 Like

Thanks, for my use case I only needed to sync the scripts majority of the time in my rojo project to the rbxl files so I just wrote my own script to do that with Lune before using rbxcloud to publish.

1 Like

Not sure what I’m doing wrong here, but I still get this problem. (This code’s a little more modified than yours)

name: Deploy to Staging

on:
  workflow_dispatch:
    inputs:
      Commit_message:
        description: Input the message for commit
        required: true
        default: "|CDS|"

jobs:
  deploy:
    name: Deploy
    runs-on: ubuntu-latest

    steps:
      - name: Checkout code
        uses: actions/checkout@v3
        with:
          fetch-depth: 0

      - run: |
          git config --local user.email "action@github.com"
          git config --local user.name "GitHub Action"
          git checkout staging
          git commit --allow-empty -m "${{ inputs.Commit_message }}"
          git merge origin/assets --allow-unrelated-histories -m "Assets • ${{ inputs.Commit_message }}"
          git merge origin/logic --allow-unrelated-histories -m "Logic • ${{ inputs.Commit_message }}"
          git push origin staging

      - name: Install aftman
        uses: ok-nick/setup-aftman@v0.3.0
        with:
          token: ${{ secrets.GITHUB_TOKEN }}

      - name: Install aftman packs
        run: |
          aftman add rojo-rbx/rojo
          aftman add Sleitnick/rbxcloud@0.5.0
          aftman install

      - run: |
          rojo build -o game.rbxl
          rbxcloud experience publish -f game.rbxl -p 14072856068 -u 4035961123 -t published -a ${{ secrets.API_KEY }}

I get this error:

Can’t understand it, cuz I already am installing it using the github action, right?

NOTE: I’m using aftman add because the master branch doesn’t yet contain aftman.toml file

1 Like

Hey, sorry for the late reply. I have switched to Arch Linux recently; I didn’t have much time to check on the forum, but anyway. I’m not sure why. The only possible reason could be because you need to add it to your aftman.toml file and not through commands. You should try to check the contents of the file before running aftman install. You can do so by running the cat command. No, it doesn’t print cats; it prints the content of a file in text form. You should be able to see what it prints in the workflow after it runs. Also, try to just add it to your aftman.toml manually in VSCode or whatever code editor you use. Make sure you actually have that file in your git repository.

- name: Check aftman.toml
  run: cat aftman.toml

You can add this somewhere, or simply change “Install Aftman Packs” to this:

- name: Install aftman packs
  run: |
    aftman add rojo-rbx/rojo
    aftman add Sleitnick/rbxcloud@0.5.0
    cat aftman.toml
    aftman install

I don’t really see anything wrong. Even though ChatGPT has nothing to say, it also suggests checking the content of the file. It also suggests, let me quote, “Try running aftman add and aftman install in the same run command. This will ensure that the aftman.toml file is not being overwritten or modified between the aftman add and aftman install commands.” Simply aftman add might override the command before; if I’m not mistaken, you can add multiple packages to aftman add, so aftman add rojo-rbx/rojo Sleitnick/rbxcloud@0.5.0. You don’t have to test the command in the workflow environment; I currently don’t have access to VSCode (since I’m still setting up my computer), so I’m sorry that I can’t test it myself to confirm. This is what the standard for most commands is.

I’m glad you reported this issue. Once I have the opportunity, I will be sure to make a well-documented explanation or even an improved guide for the most advanced usages of this. Keep up the good work, and make sure not to overthink stuff. Sometimes bugs happen in even the smallest and stupidest things; don’t rage over them. Sometimes it’s a complicated fix, but in most cases, it’s a simple fix. It’s very rare that it’s an actual issue with the tool itself, but in that case I would proceed to opening an issue on the aftman github repo, but still, this is very unlikely. In a case where the command overrides the previous one, you can open an issue with a suggestion flair or just fork it and make it yourself.

1 Like

I did change up from using commands to the aftman.toml file. That error is gone now, however it still can’t find the rojo.exe file.

name: Deploy to Staging

on:
  workflow_dispatch:
    inputs:
      Commit_message:
        description: Input the message for commit
        required: true
        default: "|CDS|"

jobs:
  deploy:
    name: Deploy
    runs-on: ubuntu-latest

    steps:
      - name: Checkout code
        uses: actions/checkout@v3
        with:
          fetch-depth: 0

      - run: |
          git config --local user.email "action@github.com"
          git config --local user.name "GitHub Action"
          git checkout staging
          git commit --allow-empty -m "${{ inputs.Commit_message }}"
          git merge origin/assets --allow-unrelated-histories -m "Assets • ${{ inputs.Commit_message }}"
          git merge origin/logic --allow-unrelated-histories -m "Logic • ${{ inputs.Commit_message }}"
          git push origin staging

      - name: Setup aftman
        uses: ok-nick/setup-aftman@v0.3.0
        with:
          token: ${{ secrets.GITHUB_TOKEN }}

      - name: List files in aftman bin directory
        run: |
          ls -al $HOME/.aftman/bin
        shell: bash

      - name: Build using Rojo
        run: |
          $ROJO_PATH = "$HOME/.aftman/bin/rojo"
          & $ROJO_PATH build -o game.rbxl
        shell: pwsh

      - run: |
          rbxcloud experience publish -f game.rbxl -p 14072856068 -u 4035961123 -t published -a ${{ secrets.API_KEY }}
        shell: pwsh

image

Normally, it will throw out an error like this (before I made some changes to my code)

I am trying to change up the way we devs will work in the team, so this code may not even be needed. But if you find a way, it would be much appreciated!

1 Like

Not sure about this one, maybe try to remove spaces in the shell script? As far as I know it does’t allow for spaces in variable assignment. Just change it to

- name: Build using Rojo
  run: |
    $ROJO_PATH="$HOME/.aftman/bin/rojo"
    & $ROJO_PATH build -o game.rbxl
  shell: pwsh

Also I see you list all files in the bin directory. Have you checked what it outputs?
I also have a theory that the script is also ran in a stupid way, I’m not sure for this one because I’m not really that good with them, but maybe you didn’t build the blocks correctly. As you can see the script is built from all of these small blocks that usually start with - name: or - uses:, my theory is that because you did - name: List files in aftman bit directory, it no longer “uses” the “setup aftman”. I mean that it no longer knows what aftman is, so I suggest for you to remove - name: and only leave run: This is only a theory and I can’t confirm it, but I suggest trying it.