I’ve been experimenting with the new mesh skinning feature, but I’ve ran into some technical limitations. Say I have this rig:
And I want to attach armor to it. Well, it isn’t exactly that simple, because the rig shown in the photo is one mesh part with multiple bones.
Which leads me to the main question: has anybody found a way to weld parts to bones? Is there some sort of new instance that supports this? This would solve not only the problem of attaching parts/accessories to certain areas of custom rigs, but also the problem of hit detection: rays can’t intersect with bones, so I would also need to weld the parts to the bones to solve this issue.
Yeah, I hope this is possible. With Unity, you can attach something to a bone by simply parenting it to the bone. In UE4, I believe that the engine has something called “attachments” which allow you to attach something to a bone.
If Roblox lacks this, it will sadly be another case of a poorly implemented feature that no one can use for months to years after it has released (since they’d be waiting for other necessary/needed features)
What about using attachments? Would they move with the rig or not?
Otherwise, I think you would be able to use the bone’s CFrame and having it relative to the meshpart CFrame
BUMPing this post - anyone find any solutions for this issue (outside of updating CFrame every tick)? Would really be great to be able to weld to bone / attach to a bone in some way.
You can make a part on the server and make a renderstepped loop to set the parts cframe locally to the bones cframe, then weld whatever you want on the server to the part and it should show up.
So in order to attach something to a bone so that it acts as a welded object, the object that you’re attaching must also be an imported mesh. This may not be true in every case, but it’s what worked for me. Here’s how you do it:
Assuming you have an imported mesh that you want to attach something to, import another mesh using the “Custom Import” tool.
Assuming your first imported mesh is in a model, take the second imported mesh and parent it to the same model as the first imported mesh (parent the mesh only, not the model that the mesh comes in).
Take the bone that is inside of the second imported mesh, and place it inside of the bone of the first imported mesh.
Create a Weld or WeldConstraint inside of the second imported mesh. Set its Part0 to the first imported mesh, and its Part1 to the second imported mesh.
Voila. You now have an object that is welded to your deformed mesh. You can change the bone properties, and the attached mesh will update it’s position/orientation with respect to the parent mesh.
In the picture above, “CameraRootPart” is the primary mesh part (the block in between the arms), and “ViewModelMesh” is the attached mesh part. We can see that, upon selecting the WeldConstraint that is parented to ViewModelMesh, both the CameraRootPart and ViewModelMesh meshes are highlighted. I would show a video on how to set everything up, but I can’t upload any videos for some reason. If anyone is still having trouble with this, just reply here and I’ll try to help.
Hey, what you said worked for me. However, I’m trying to weld through scripts. and I could use a weld constraint, but is there any way I can index a bone and then weld an imported meshpart to that specific bone?
Thanks
It took me days and weeks to understand @Trialogical, but here’s what he meant:
-Take Two Meshes (Let’s take Mesh1 as a viewmodel, and Mesh2 as a stick)
-Note that both Meshes need atleast one bone, which means, the stick will have a bone in it (this can only be properly done in Blender through actually joining the armature to the stick mesh, because simply adding a bone to the stick in RBX Studio won’t work.)
-Take the Stick’s bone (the one you just made in Blender and imported the whole mesh with the bone to studio), and parent that bone to one of the bones in your viewmodel. I have a bone named Hand in my viewmodel, so I simply drag the Stick’s bone, and parent it to the viewmodel’s “Hand” bone.
-You will notice it doesn’t weld yet. There’s one thing left to do. Put a WeldConstraint in the viewmodel (Doesn’t matter where, just put it under the viewmodel)
-Set Part0 to viewmodel and Part1 to the Stick Mesh.
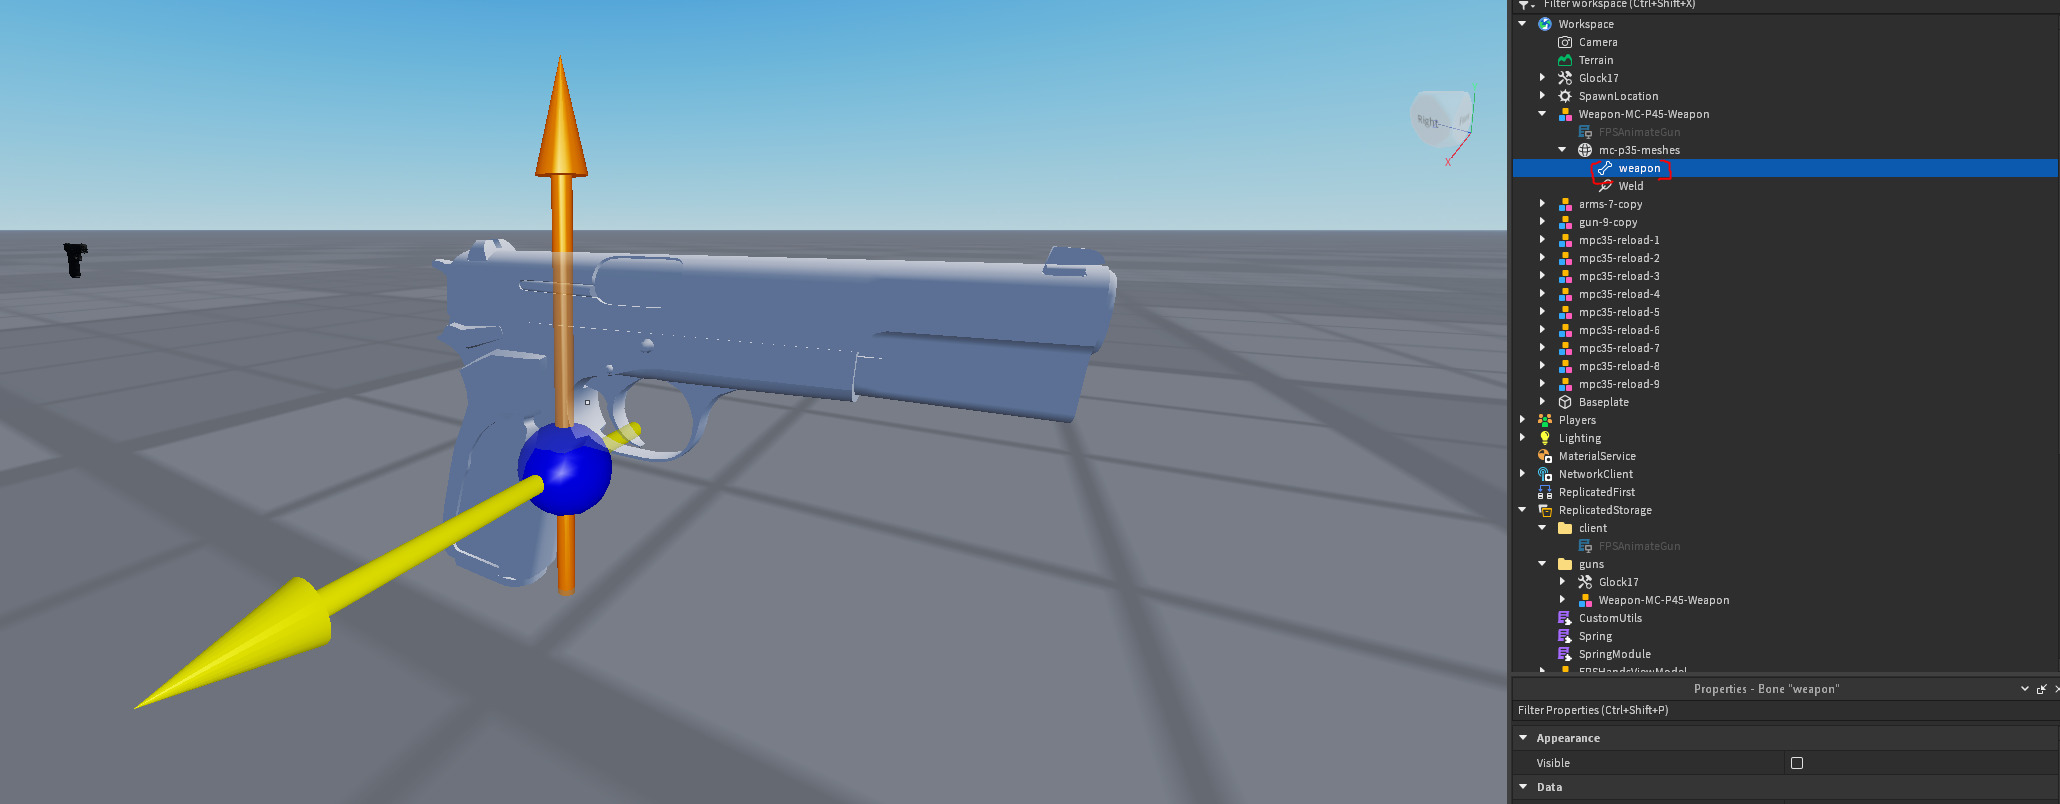
Im having trouble making my weapon. This is my current setup. Theres a skin group for the entire gun called “weapon” with a bone named “weapon” set as the parent. The meshes reside within the armature. When imported into roblox I dont see the bone. Is there something I am doing incorrectly?
This is the real answer. Previous answers suggested taking models from blender, putting a bone in it there and then putting it back in roblox, but you can just put a bone on a part in roblox and use a RigidConstraint to “weld” the two bones you want together.