Location Marker System
Hello again developers! Recently I’ve been working on a really cool project: a GUI based location marking system! This system helps players find their way around the map, especially things off screen. I had a ton of fun designing the algorithm to do this. I’ll explain how it works below for anyone interested.
Showcase
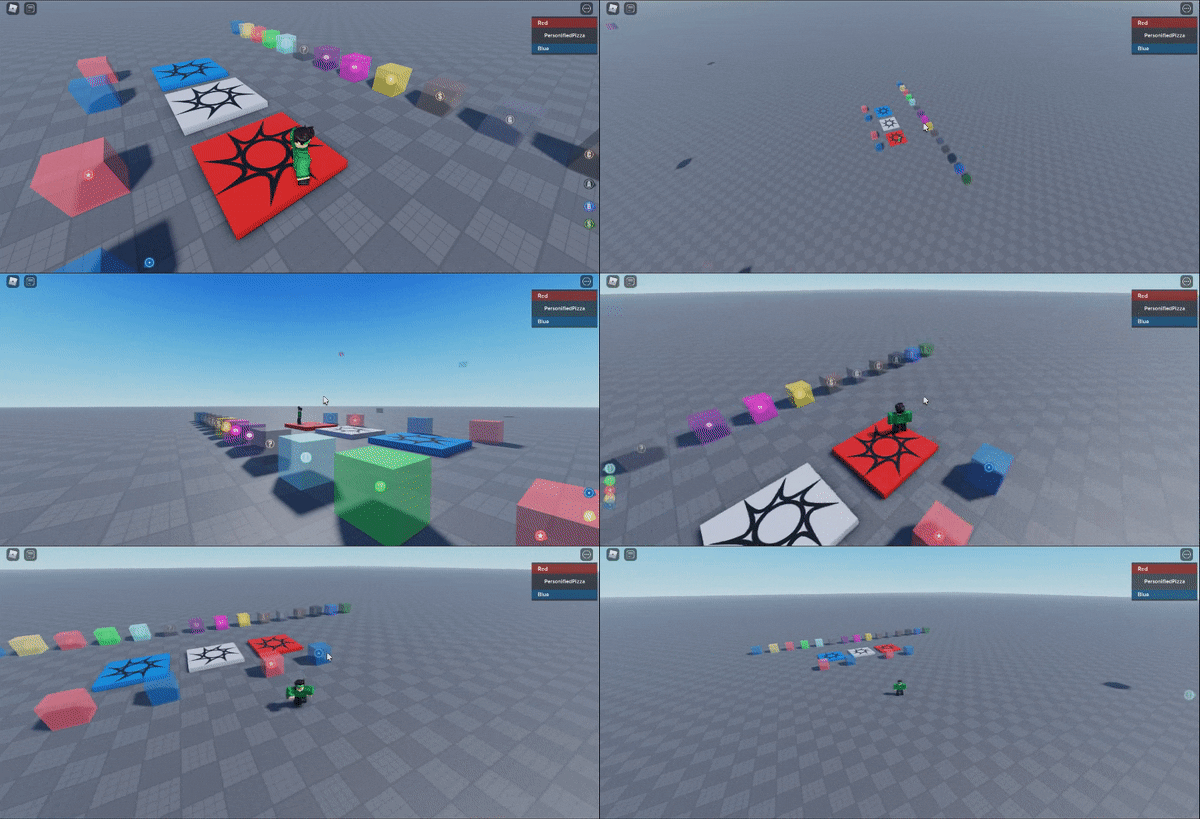
Without further ado, the GIF!
(Location Marker System (Game) - Roblox)
Details
For everyone interested, here is a detailed guide on how the algorithm works.How The Algorithm Works
To start, lets look at what the algorithm does. It has two parts: positioning the GUI and getting the direction the arrow should point.
When the location is on screen, the algorithm is very simple: there isn’t an arrow, and the position is based directly on
Camera:WorldToScreenPoint(Vector3 worldPoint).The complexity begins when the location becomes off screen, or in this case, off the “buffer” screen (screen size with a bit of each side cut off).
The first goal here is to get the 2D direction the camera should move to look directly towards the location. We can do this by taking the offset between the location’s position and the camera’s position, then changing that Vector3 offset (which is currently relative to the world) to be relative to the camera. We can do this with
cameraCFrame:VectorToObjectSpace(offset), wherecameraCFrameis the camera’s CFrame and offset is the offset between the location and the camera (location - cameraCFrame.Position). Now we have something like this:
(Note the length of the red vector can be any value)
Now, how does this help us find what we want to find? Well, we want to find the green arrow in this picture:
The green arrow is the 2D direction we want the camera to move to get to the direction of the red vector. Here is a 2D picture of this set up looking at it head on:
So how do we do this? Well, all we need to do is take out the forward part of our 3D direction to the object. We can do this with:
Vector2.new(relativeDirection.X, relativeDirection.Y), whererelativeDirectionis the 3D red vector in the pictures above. Now we have that green arrow, but we want it to be normalized: have a magnitude/length of 1. To do this, we just get the.Unitproperty of the Vector2:Vector2.new(relativeDirection.X, relativeDirection.Y).Unit
And we did it: that’s the direction the arrow should face!Now we need to get the position the GUI should be at. First, we get the longest distance of the buffer screen:
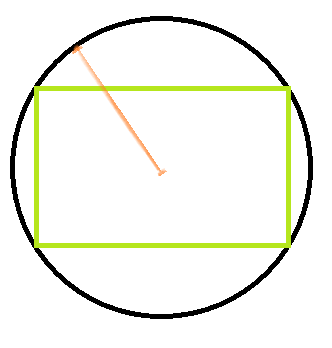
Using this length, we can conceptually make a circle around our buffer screen with a radius of this length:
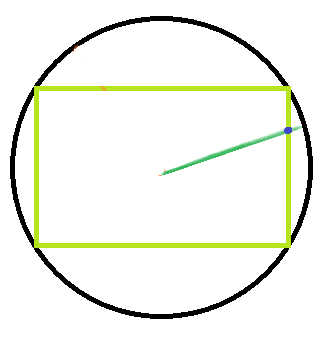
Now if we take our direction (the 2D green vector) and multiply it by the longest distance, we get something like this:
Notice that blue dot? That’s the position were trying to find. To find it, we need to split this into two cases: when the end point of the green line is past the sides of the lime box (the buffer screen) and when the end of the green line is past the bottom or top of the lime box.
To do this, we simply check if the absolute value of the Y component of the green line is greater than half the height of the box. If it is, the blue dot falls on the top or bottom of our screen. If it’s not, then the blue dot falls on the sides of our screens.
In both of the cases below, we are trying to find a number to multiply the direction vector (the green vector but with a magnitude of 1) so that the resulting vector ends on the side of the lime box (buffer screen).
Case 1, The dot falls on the top or bottom of the screen:
In this case, we want the y component of the position of the blue dot to equal plus or minus half the height of the screen. We can use trig for this:
(height refers to the height of the buffer screen(the lime box))
This means all we need to do to get the position of the blue dot is
relativeDirection2D * math.abs(maxBoundsY/2/relativeDirection2D.Y)
where relaitveDirection2d is the green vector with a length of one, maxBoundsY is the height of the lime box, the buffer screen. (If you’re wondering why there are absolute values, it’s in case a is negative. If a is negative then it cancels out the negative direction of the direction vector (think -1 * -1 = 1).)And that’s everything! We know the direction the arrow should face and the position the UI should be in!
Features
- Customizability: the color, image, and visibility of the indicators can all be adjusted easily.
- Automatic updating: when a player’s team or an Indicator’s Attributes are changed the GUI responds.
- Automatic clean up: indicators can be destroyed without causing problems
Instructions
- Get the model here: Location Marker System - Roblox.
- Insert the model into your game.
- (Optional) Move “IndicatorsClient” from “Loader” to StarterPlayerScripts (StarterPlayer > StarterPlayerScripts) and remove “Loader”
- That’s it!
Want to use this for a game with StreamingEnabled? Look at this reply.
Creating Indicators
I’d recommend just copying existing indicators and changing the settings, but if you want to create a new one:
- Create an Attachment and name it “Indicator”
- Add an attribute “Color” of type Color3
- Add an attribute “Enabled” of type boolean
- Add an attribute “Image” of type string
- Add an attribute “Team” of type BrickColor
Changing the Color and Image
- Open properties
- Select the Indicator
- Change the Color and Image attributes:

Changing the Visibility
There are two ways to change the visibility: you can change the Enabled attribute or set the Team attribute. The Enabled attribute turns the indicator on and off. The Team attribute sets which team can see the indicator (set to the team’s BrickColor). If you want all teams to see the indicator, set the Team attribute to the White BrickColor (neutral team color).(Advanced) Changing the Size of All Indicators
To change the size of all indicators, go into the CreateNewIndicator module (IndicatorsClient > CreateNewIndicator) and look at the first line it should look like:local DEFAULT_SIZE = UDim2.new(0.038, 0, 0.038, 0). Change the values to what ever you want (example:local DEFAULT_SIZE = UDim2.new(0.041, 0, 0.041, 0)).
Last Bit
Let me know if you have any feedback! I hope you all find this helpful
Model: Location Marker System (Model) - Roblox
Uncopylocked game: Location Marker System (Game) - Roblox
 . I’ll explain how it works below for anyone interested.


 )
)


