Advanced Dialogue System + Node Editor

After the initial release of the first version of this system I decided to remake the entire thing from scratch to not only make it perform better but for it to be far more flexible and customizable.

You can find the older version of this system here:

Now then, here’s a small preview of the dialogue system in action:

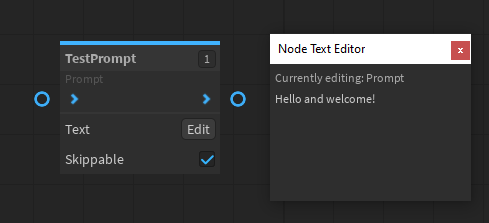
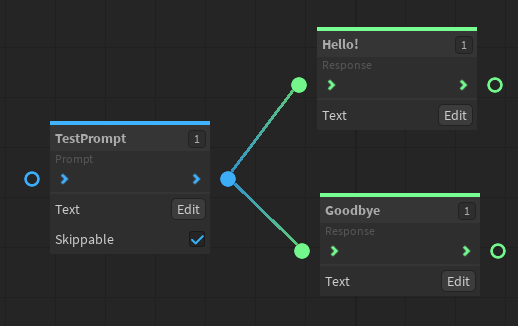
This is a very simple dialogue that I put together in a couple of minutes using the node presets I created for the dialogue system. Now here’s how it looks inside the node editor:

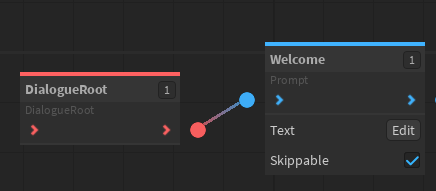
A dialogue starts with a DialogueRoot node. This is what determines the beginning of the exchange. From the root you can start branching out your dialogue with a selection of different nodes.

Here is a list of all the different nodes:

image

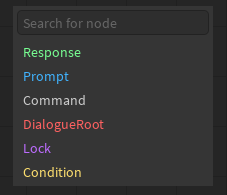
This is the search menu. It can be opened in the editor by pressing S. Every node you have in the NodePresets folder in ServerStorage will be displayed here. Now then, let’s start going over what each of these nodes do

Dialogue Root

Marks the beginning of a dialogue
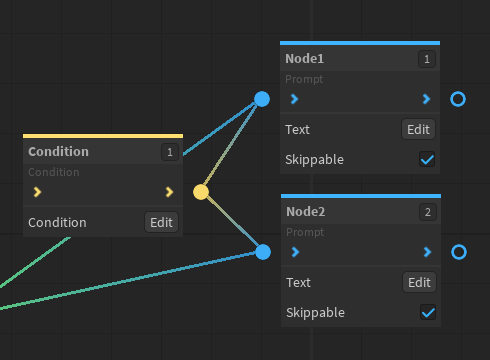
image

Prompt

Displays a wall of text to the player.
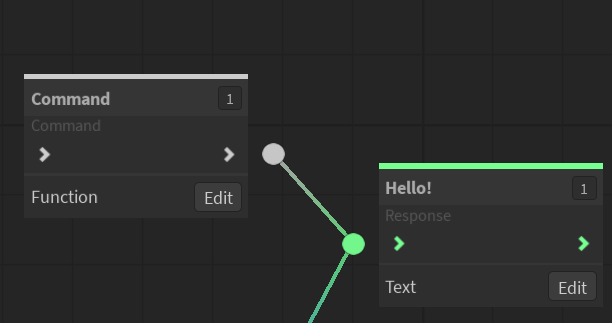
image

Response

Gives the player options for responses during dialogue.

image

Command

Runs any code on the client side.

image

Condition

Condition nodes are used to select one node out of many using a function. For example: Select Node1 if player has over 100 Gold, otherwise select Node2. (More in depth instructions can be found in the condition module script)

image

Lock

Lock is used to lock certain paths that can be later unlocked. The Main Pathway is used to determine the locked node while the Toggle path is used to determine the node that you must get to in order to toggle the value of the lock.

Now then, here’s what you’ll need to get this up & running.

First off, the main framework. This is the node editor used to create & manipulate dialogue.

Side note regarding this plugin: This plugin is not made only for the dialogue system as it is an actual working system by itself and can be used for many other projects. I plan to make a separate dev forum post about this once I think it’s polished enough to have its own spotlight.

And then the dialogue system itself:

Here’s what it contains:
image

  • DialogueEvents contains the necessary remote event & bindable event for initiating dialogue. Location: ReplicatedStorage

  • NodePresets contains the necessary nodes for creating dialogue. This is utilized by the Node Editor plugin. Location: ServerStorage

  • DialogueUI is the main thing. This contains the UI and the code for the system to actually work. The given UI is not exactly meant to be used in a final product it’s more of a place holder to test the system. So if you have plans for the UI that fits your game better then do use that instead. The structure of the UI should be simple enough so modifying it to your needs shouldn’t be hassle. Location: StarterGui

  • TestDialogue is a quick example of dialogue made with the system that you can check out if you want a quick look of the system. Location: Wherever

If you don’t care to place all the stuff into the right places by hand you can also run this installation code inside studio:

local Folder = workspace:FindFirstChild("DialogueSystem",true) 

if game.ServerStorage:FindFirstChild("NodePresets",true) then 
	for _,Node in pairs(Folder.NodePresets:GetChildren()) do
		Node.Parent = game.ServerStorage:FindFirstChild("NodePresets",true)
	end
else
	Folder.NodePresets.Parent = game.ServerStorage 
end 

Folder.DialogueEvents.Parent = game.ReplicatedStorage 
Folder.DialogueUI.Parent = game.StarterGui
Folder.TestDialogue.Parent = workspace

Folder:Destroy()

And now you should be all set! To initiate a dialogue, you must simply fire either the bindable- or the remote event inside the DialogueEvents folder and send a dialogue configuration as an argument. For example:

But wait, there’s more!

With the dialogue configuration you can also send dialogue parameters. These are used to determine wether or not the dialogue should close if you walk too far away from a certain position. They can be also used to set the speaker of the dialogue aka the thing you’re talking to. You can also manipulate it directly inside the UI using command nodes if you for example want to have multiple characters talk to you.

Here’s an example of the parameters being used:

And that should be all! If something was left unclear, let me know. I would also love to hear what you think of the plugin and the system. If you have any cool ideas or features you’d like to see in future updates then let me know as well. And while not necessary; if you do end up using this in your own projects I would really appreciate being credited.

If you liked this, I highly encourage you to check out my other work as well:

That’s all! Thank you for stopping by and I hope you have a nice day!
-Sol

525 Likes

BRO this is the best plugin yet, the GUI looks Soo good, the editor is easy. 9999/10.

31 Likes

I’m very glad you you like it! I was trying quite hard to make it feel somewhat native to Roblox Studio so that it wouldn’t feel out of place. But at the same time, I was having trouble finding references for this kind of UI within Roblox so I turned to Blender and whatnot to draw inspiration from.

I’m quite happy with how it turned out even though it could probably be improved in a lot of ways. But that’s a matter for the future. Now I’m just happy to finally get it out to the public :slight_smile:

10 Likes

This is fantastic! Scripting NPC’s will be so much easier

7 Likes

I actually don’t have words on how much this can help people. The only thing I could think of was “wow.” This (your plugins) is the kind of stuff you see people getting paid 100k+ salaries to make in the software development industry. And you did it for free. I’m sure if you set up somewhere for people to donate to you, you could make a lot of money and keep your plugins free.

19 Likes

I’m very happy to hear you say that. I was actually wondering one time wether or not it’s allowed to promote things such as a creator’s Patreon or something alike. I think it would be great for many creators who focus on things such as creating tools for the community to use. And as it is right now, the only way to earn income through plugins in Roblox is to be a part of the tiny program unless they’ve changed the terms on that thing. Do you happen to know if the kind of promotion I was talking about is allowed or not?

4 Likes

This is amazing! The UI looks top quality, and really everything else about this plugin looks like you put a lot of effort into it. You could honestly make a TON of money from selling things like these. Great job!

5 Likes

Unfortunately I don’t know whether you can link a patreon or not (in devforum). Though imagine how cool it could be if they added a patreon social link to plugins so it showed a patreon icon on the plugin page, it could look something like this:

And the developer could link it to their patreon if they wanted. Obviously, like other social links it could only show to 13+ users so it should be able to be added. There could even be a little dialogue after you install like “If you like this plugin, consider supporting the creator on patreon: (link)” or something along those lines. But honestly I don’t see roblox ever adding this because it directly goes against their business model… They want as many people as possible to go through roblox so they keep as much money in their pockets as possible. If money goes directly to a creator, they don’t get any cut, which from a business perspective isn’t good. Though if they could ever add it that would be amazing.

8 Likes

been excited for this for a while!!

3 Likes

Is there a way to move the camera inside the node editor?
Right now I can only zoom in/out

4 Likes

Thanks for the information. This is what I was looking for, dude!

3 Likes

Yeah you can use middle mouse to drag the the camera around. Additionally I can add support for M2 input for dragging if that’s preferable

5 Likes

Oh i didn’t know that, yes M2 is a lot more intuitive. Thanks for letting me know :slight_smile:

3 Likes

Oh by the way heres another suggestion since i bet a lot of people will want to make clean/symmetrical nodes: Grid Snapping so we can snap the items to the grid when we drag them around (could be activated while holding shift)

2 Likes

i cant seem to initiate the dialogue. im using the code you provided and it didnt work,

2 Likes

its :FindFirstChild not .FindFirstChild
also :FireAllClients can ONLY be called from the server, not the client.
You can also do :FireClient(game.Players.PlayerNameHere, path_to_quest)

6 Likes

This looks great and much cleaner, but in my opinion this seems less like it should be called an “advanced” version of the older Dialogue System, and more of a “2.0”.

Also, can I ask what’s the limit on how many Response choices you can make and is it possible to arrange responses the way you want? Can’t try it out for myself right now.
On the original it seemed like there was a limit on how many responses you could make and if you added too many it would just remove some from the prompt. It also seemed like responses were arranged randomly before and this could result in the “Goodbye” choice being in the middle of the page, which looks weird.

4 Likes

The original system didn’t have an original name that I could reuse for a 2.0 release so I decided to go with a different name. If I do end up coming up with a good name for the system I can definitely rename both.

And yes, both issues have been addressed. There is no longer a written limit for responses in the code, rather a limit in the UI space so you can technically make as many responses as you want as long as your UI has enough space for them. And yes, there is a way to organize the responses. On the top right corner of each node is what I call a “Priority Value”. It has different uses in different nodes but for responses it determines the layout order.

4 Likes

Theres one thing that confuses me, why are condition nodes designed this way?

Why cant we just do this instead since it makes a lot more sense


Basically go from DialogueRoot → Condition → Prompt instead of going from DialogueRoot → Prompt → Condition → Back to the right Prompt?

7 Likes

sorry bout that!! i tried it again with :FindFirstChild and didn’t work because i was using the command bar.

2 Likes