Today, if you want to import a mesh with a SurfaceAppearance (PBR textures), you have to first import the mesh, then import the individual images, then create a SurfaceAppearance, then manually assign asset IDs, and finally your mesh looks right.
We’ve added native PBR support to the Unified Mesh Importer, which lets you import a mesh with SurfaceAppearance at the same time in a single step. There’s even a live preview so that you can ensure your mesh looks great before you click Import.
To ensure our importer can read SurfaceAppearance information from your FBX files, you need to setup shaders properly in Blender, Maya, or whatever DCC tool you’re using to create your meshes.
How to set up the shaders properly in common tools:
Blender
To take advantage of importing PBRs in blender make sure you’re using a principled BSDF material.
Then in the shading tab, hook up your image texture nodes for Base Color, Metallic, and Roughness directly into the correlating BSDF slots.
- You can create new nodes by clicking add or pressing shift+a.
A normal texture can be applied similarly but with the catch that the image texture node must be routed through a normal map node before being sent to the BSDF shader.
Finally just export your scene as an FBX as normal and you should see your new textures when you import with the new mesh importer!
Maya
Supported Shaders**:
- Standard
- AI Standard
Setup:
-
Open up the Hypershade by clicking on the Button here:
-
Under “Create Window”, navigate to Maya>Surface and click on and select “Standard Surface:”
-
You will also need to navigate to Maya>Utilities and click on and select “ Bump 2d” to plug your normal map into:
-
The Material will appear in your “Graph Network” . Drag and drop your PBR textures to the Graph and hook up accordingly. Make sure your “Bump2d” is set to use as “Tangent Space Normals” and your Normal Texture to Color Space “Raw:”
-
Select your model and navigate to your Browser Window to the Materials tab and right click on your Material and “Assign Material To Selection:”
-
Export model using your desired setting and “FBX File Format” as “ASCII FBX 2020” or “Binary FBX 2020:”
3DS Max
Supported Shaders**:
- PBR Surface
Setup:
-
Open up the Material Editor by clicking on the Button here or using the hotkey “M:”
-
Under Materials>General, Double click and select “PBR Material (Metal/Rough):”
-
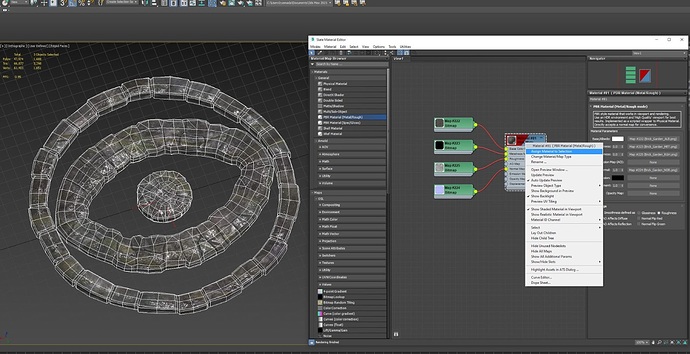
The Material will appear in “View1”. Drag and drop your PBR textures to the correct slots under the “Material Parameters:”
-
Select your model and Right Click on your Material and “Assign Material To Selection:”
-
Export model using your desired setting and “FBX File Format” as “ASCII FBX 2020” or “Binary FBX 2020:”
Note that if you don’t have PBR textures, we will continue to import your textures as we did before and not create a SurfaceAppearance object automatically.
We hope you all try this new feature and have a more seamless experience with importing your assets into Studio. We’ll continue to work on improvements, fixes, and additional features to make your workflow even easier. Happy importing!
Finally, we’d like to thank the engineers that built this! @tasavix @OriginalSleepyHead
And an additional thank you to everyone else who helped make this feature a reality! @MisoPonyo, @CurbM0nkey, and the many others who helped us test.
**Currently surface appearances will only work with full model uploads. I.e. with the “Import as model” option checked. Uploading them as individual meshes will upload the mesh part alone.
***These represent the material flows we’ve tested and ensured work. It’s possible that other shader combinations might work, but we currently don’t formally support them.


