Introduction
Hello, I am 12904, a builder/scripter/animator/group owner/100 other things…
I have been on roblox for almost 7 years and developing for the past 4. Just recently I’ve gotten into rigging and animating models… This was a very hard task for me since there was literally no good tutorials on it. So I decided I was going to learn to do it myself, so here I am.
Starting
To start, we are going to need 2 plug-ins.
Character Creator (VIEW SOLUTION)
Animation Editor
(NOTE: I am using the outdated version of this since I like it better, the updated version is there)
Once you have installed these, we can get started!
For this tutorial I am going to be using a swing-set made by @NANOPIXELLOVER that I’ve been needing to animate anyway. I figured this would be a good thing to do a tutorial on.

Step 1
So basically we need to prepare this for rigging… Rigging is the term we use for making the joints that the animation editor recognizes.
Any rig needs 2 main components. A Root-Part and a Humanoid. These are kinda the driving components of the rig.
For the Root-Part, I am just going to pick the part that everything else is based off of and copy it. Making sure to set its transparency to 1, Anchored to true, and CanCollide to false. All of the other parts need to be un-anchored as well. You also need to be naming the root-part “HumanoidRootPart”
For the humanoid, it is as simple as inserting a humanoid inside of the model.

Step 2
Next is, for me, the most tedious part. We need to start creating the Rig.
Head to your plug-in tab and click on the CharacterEditor. It should bring up a gui in the top left corner.

So lets click on the model and press Edit. It should pop up a new gui with 4 options. Bind, Edit, Release, and Finish.

For right now, lets click bind. Then it is just as simple as clicking on certain parts in order. If you are familiar with scripting, you will understand the Child-Parent model. It is the same thing for rigging, we need to select the parent then the child… So the “grand parent” of everything is the Root Part. We need to bind it with the next Generation which is the frame in this case. The first part you click will act as the parent, then the next as the Child.

Now we got a Motor6D joint inside of the RootPart that connects the frame to the Root. Now lets just continue this process. In this case, the next parent inline is the Ropes. We have 2 ropes so there will be 2 children. Lets click on the frame then a rope, then do the same for the other rope.

Lets finish up the rigging by joining the seats and we’re ready start editing. Same process as before, lets just select the parent, which is the rope in this case, then the child, which is the seat. Once we have all of these in. Lets move on to editing the joints.

To edit the joints, instead of pressing “Bind”, we need to press Edit, it will bring up a layout of all of the joints.

We can just click on the join to move it to the position we need it, the main join(RootPart to Frame) is perfect where it is at. But since we want the swings to work like an actual swing not just a piece of rope pivoting on an axial, we are going to need to move the where the rope meets the frame. To do this, just click on the joint and you will be greeted with the positioning Gui that roblox uses. Remember in the bottom left there is 2 options… We also have the ability to change the increment of moment as well as if we are rotating or not. You can see there that they are Labeled K and L to change them.

This is what mine looks like after we finish. Now we can just click on finish and get on to animating.
Step 3
Now time for the fun part, animating! We have a fully rigged model, all we need is to animate it…
To do this, just go click on the animation editor it should bring up a screen like this.

Click on your Model and press Select. It should open the main animation editor.

Since I all I doing is a simple swinging animation, I am only going to have 2 different frames that are looping… I have my time set to .5 which is plenty for a animation like this. Animating is just creating frames that the Rig tweens to when called. Since this is going to be a swinging animation, its perfect!
So for the first frame, I am just going to have 1 swing back and one forward.

For the next frame, I am going to do the inverse. So the one that is back will be forward and the one that is Forward will be back. I am going to be moving the time-bar to .25 seconds since this will be halfway.

Since this is going to be looping, I need to repeat the first frame as the last frame, I can just copy and paste it over.
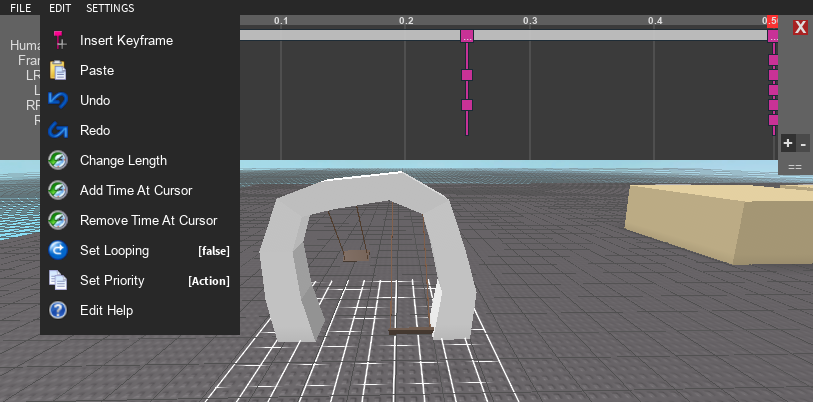
Finally we have to set Looping to true, just click on the Edit menu and near the bottom there will be a option named “Looping”, just set it to true.
Now we just need to export the animation to roblox, just click on the File menu and scroll down the Export. Just follow the steps to publish by selecting “Create New.” Don’t forget to save the redirect link on the final page.
Step 4
Testing… After all of this work, I don’t know about you, but I want to see a swing move…
Lets replace the humanoid inside of the model with AnimationController and place a animation inside the model as well.

Now just paste that redirect link inside of the AnimationId property of the Animation. Since this is not a scripting tutorial, I am just going to write a simple script to see it work.
Insert a script inside of the model and paste this code.
wait(1)

local loadedanimation = script.Parent.AnimationController:LoadAnimation(script.Parent.Animation)
loadedanimation:Play()
Step 5
Sit back and admire your work!
Note I did change the speed from .5 to 1.5
Conclusion
I hope this tutorial is useful for you. This has been a topic that I’ve needed multiple times just never been able to find a good tutorial on.
–12904


